
Crop Video Premiere Pro in 2024, When using video editing software such as Adobe Premiere Pro, you have access to an infinite number of options, including the ability to change the duration of a video, add visual effects and texts, and even improve audio. Sadly, there are situations when the footage you obtain may not be as good as you had hoped. In these cases, you will need to crop out scenes that should not have been included in the video, such as people walking by, advertisements for brands you are unable to display, or objects that are above or below the frame.
Table of Contents
Easy Steps to Crop a Video in Adobe Premiere Pro
Learn how to crop a movie in Adobe Premiere Pro and how to modify your content afterwards by following this instruction. Let’s go properly.
Step 1: Import Your Media Files to Your Premiere Pro Project
Choose Import File from the File option in the top menu in premiere adobe.. You can look for a video clip in any folder on your computer or on external storage devices that are connected to it using the pop-up window. Click open to import the desired video when you’ve located the folder. Right-clicking on the project area will bring up the Import menu. There will be a drop-down menu; select Import to bring up the Import window and look for the video. Try using CTRL + I or CMD + I on your keyboard to open the import window if you use the shortcuts. Alternatively, you can drag and drop the files into Premiere Pro from the Finder or Explorer Window.
Step 2: Set the Project Timeline for Editing
You cannot change the video clip that is currently on our project. To modify the video clip, you must add it to the Timeline next. Simply drag and drop the video clip onto the Timeline section to prepare everything for editing and Crop Video Premiere Pro .
Step 3: Activate the Effect Menu
You can begin applying the required effect from the Effects menu after your film is on the Timeline. If the effect menu isn’t visible, make sure Effects is checked so that the Effects tab is visible by going to Window on the main menu.
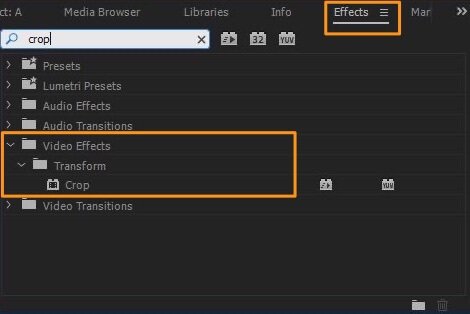
Step 4: Search and Add the Crop Effect
The crop tool is located in the project panel; you will need to look for it. You can locate it by searching for “Crop” in the toolbox or by going to Video Effects > Transform > Crop. Choose the video track in the Timeline, then double-click Crop to create the crop effect. The cropping effect can also be dropped onto the choice video track.
Step 5: Navigating the Effects Control Panel
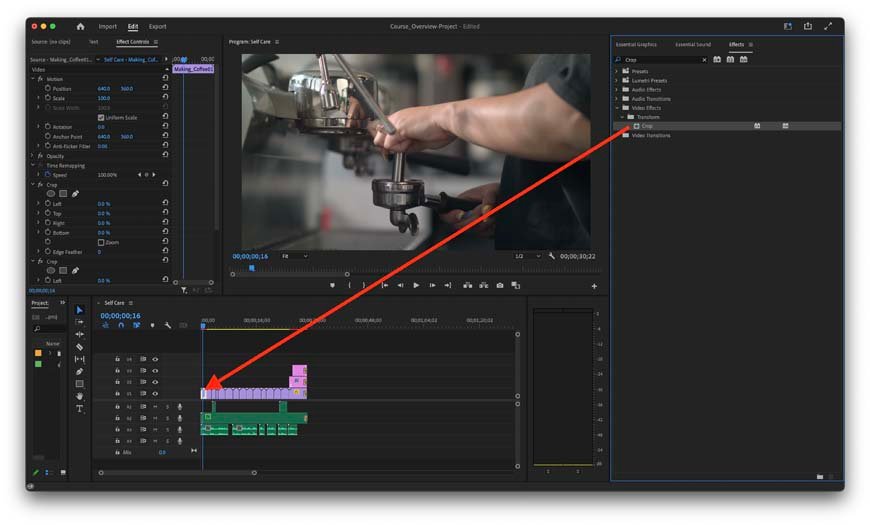
A new area named Crop will show up on the Effects Control as soon as you add the new effect to the movie on the Timeline. Click on the Effects Control panel, then select Crop by scrolling down. To see more controls for that effect, select the left arrow. There are three ways we can crop: by dragging the sliders, by typing the percentages, or by using the handles on the preview. I’ll give you the instructions for everyone.
Cropped Video Using the Preview Handles
Click on Crop from the Effects Control window. Examine the video and click on the deal enclosing the clip. To adjust the margins and crop the video, drag the handles around it. The video image will be replaced by black bars. This technique is similar to cropping an image and can provide a simple, rapid fix.
Cropped Video Using the Sliders
Scroll to Crop in the Effects Control menu. To see the controls for the Left, Top, Right, and Bottom, click the arrow. To see the slider for each side, click the arrows to the left of each area. To crop the left, top, right, and bottom sides of the video and add the black bars surrounding it, use the slider.
Cropped Video Using Percentages
You can enter the percentages for each side to get a more accurate crop for your video if you’d like more control over the cropping effect. Look for the Crop controls in the video Effects Control section of the project panel. Click the left arrow to see the Top, Left, Right, and Bottom percentages control. To change the number, move the cursor over the percentages and hold it there. The video will start to crop on that side, as you can see in the sample.
You have the option to double-click the % and enter the exact quantity you’d want to see. Watch an early look at the video. If you’re making a split-screen video, you may use this method to trim clips so that all of your videos are the same size.
Step 6: Edit the Crop Video
Additionally, you can zoom in or out of the newly cropped movie, as well as alter its location.
We can soften the cropped video’s edges by using the Edge Feather option. When you add a background colour or divide the screen to give the impression that the video is floating over the background or to create a transition effect, it can be useful. Hover the cursor over 0 until two arrows appear, then click and drag to adjust the effect’s strength. The edges will appear softer and have a transition appearance as the number increases. The edges will get sharper if the value is decreased.
There’s also a Zoom checkbox under Crop. The video sections will stretch to cover the frame when you click Zoom, removing the black areas that the crop left behind. Be advised that the video quality and visual characteristics may be impacted by this stretch.
If you want many scenes to play together in the same frame while watching a multi-screen video, we can reposition the video clips to fit the screen. Choose the clip that needs to be moved. Go to Effects Control in the project panel and type Motion > Position. To move the video, use the position values. The video segments are moved vertically by the second value and horizontally by the first. You can also adjust the video size under Motion to suit the needs of the project.
Conclusion
In Premiere Pro, you may create a variety of expert intros, transitions, and scenes for The video by using the crop tool. Explore all of the crop effect library’s controls and use your special imagination to realise its full potential.